
Pricking your finger several times daily to check blood sugar has been standard practice for decades. Continuous glucose monitors (CGMs) offer a different approach. A small sensor sits just under your skin and measures glucose every few minutes, sending results to your phone or a receiver. For many people, this technology transforms diabetes management.
📖 In This Guide
- What a CGM is and how it works
- Available systems — Freestyle Libre 3 vs Dexcom G7
- What you see on the screen and how to read trend arrows
- Understanding time in range
- Who can benefit from CGM
- Step-by-step guide to getting started
- Practical tips for daily use
What Is a Continuous Glucose Monitor?
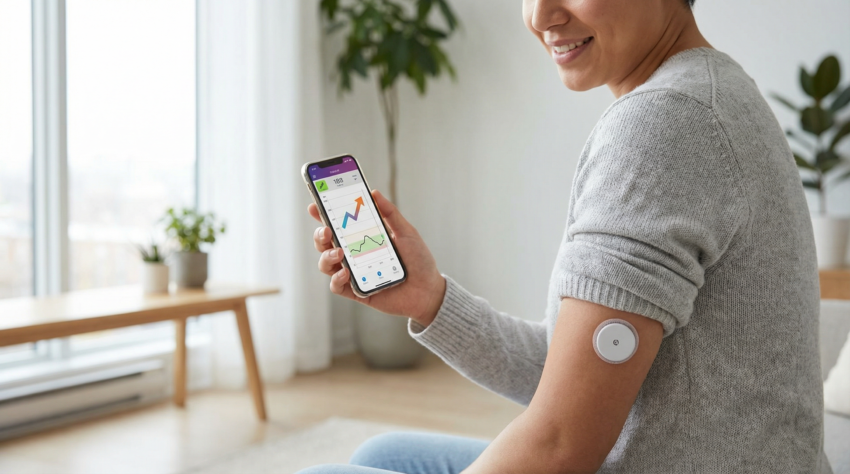
A CGM consists of three parts. First, a small sensor with a thin filament that sits in the fluid just beneath your skin. Second, a transmitter that attaches to the sensor and sends data wirelessly. Third, a receiver — which is often your smartphone with the manufacturer’s app installed. Some systems use a dedicated reader device instead.
The sensor measures glucose in interstitial fluid, not blood. This fluid surrounds your cells and receives glucose from your bloodstream. There is typically a 5 to 15 minute lag between blood glucose changes and interstitial fluid changes. This delay matters most when glucose is rising or falling rapidly.
Most sensors last 10 to 14 days before requiring replacement. You apply a new sensor using an applicator that inserts the filament automatically. The process takes seconds and most people describe it as painless or nearly so.
Available Systems
📊 Freestyle Libre 3 vs Dexcom G7 — Side by Side
| Feature | Freestyle Libre 3 (Abbott) | Dexcom G7 |
|---|---|---|
| Sensor Size | Smallest available (2 stacked coins) | Compact |
| Reading Frequency | Every 1 minute (continuous) | Every 5 minutes (continuous) |
| Warm-Up Time | 60 minutes | 30 minutes |
| Sensor Duration | 14 days | 10 days |
| Insulin Pump Integration | Limited | Yes — automated insulin delivery |
What You See on the Screen
CGM apps display your current glucose level and a trend arrow. The arrow shows whether glucose is stable, rising slowly, rising quickly, falling slowly, or falling quickly. This directional information helps you anticipate what might happen next.
A graph shows your glucose over the past several hours. You can typically view 3, 6, 12, or 24 hours. Patterns become visible that finger pricks would miss. You might discover that your glucose spikes after breakfast but not dinner, or that it drops during sleep.
Alarms alert you when glucose crosses thresholds you set. Most people configure alerts for high glucose (perhaps above 10 mmol/L) and low glucose (perhaps below 4 mmol/L). You can also set predictive alerts that warn you before reaching these levels based on your current trend.
Time in Range
✅ What Is Time in Range?
Time in range represents the percentage of time your glucose stays within your target zone — typically 3.9 to 10 mmol/L. International consensus recommends aiming for 70% or more time in range for most adults with diabetes. It offers advantages over A1C because it shows variability that A1C averages out.
Who Can Benefit?
CGM originally targeted people with type 1 diabetes using insulin pumps. The technology has expanded dramatically. Many people with type 2 diabetes now use CGM, including those not taking insulin.
- If you take insulin: CGM helps with dosing decisions and catching low blood sugar early. Overnight monitoring while sleeping provides safety that finger pricks cannot offer.
- If you manage type 2 with tablets or lifestyle: CGM provides feedback on how food and activity affect your glucose. Seeing a spike after rice but not after lentils teaches you more viscerally than reading about glycaemic index.
Getting Started — Step by Step
- Discuss with your doctor or diabetes team — they can advise whether CGM suits your situation and help navigate insurance or NHS access.
- Read the instructions carefully when you receive your first sensor. Watch the manufacturer’s tutorial videos.
- Choose a sensor location recommended by the manufacturer — typically the back of your upper arm or abdomen.
- Clean the skin with alcohol and let it dry completely before applying.
- Press the applicator firmly against your skin and push the button. The sensor attaches instantly.
- Wait for the warm-up period to complete (30–60 minutes depending on your device) before trusting readings.
- Set your alerts for high and low glucose thresholds that match your personal targets.
Practical Considerations
⚠️ Things to Know Before You Start
- Sensor detachment: Sensors can detach during physical activity or showering. Adhesive patches sold separately can help.
- Compression lows: Sleeping on your sensor can cause falsely low readings due to reduced blood flow. Check whether you are lying on your sensor before treating a night alarm.
- Accuracy: Sensors are generally accurate within 10–15% of blood glucose. Readings may be less accurate in the first 24 hours and when glucose changes rapidly. If a reading seems wrong, confirm with a finger prick before acting.
✅ Key Takeaway
CGM provides continuous glucose data through a small sensor worn on your body. Current systems from Abbott (Freestyle Libre 3) and Dexcom (G7) offer reliable, user-friendly options. The technology suits people with type 1 or type 2 diabetes and provides actionable insights about how food, activity, and medications affect your glucose throughout the day and night. Talk to your diabetes team about whether CGM is right for you.
Sources: Abbott and Dexcom product documentation, International consensus on CGM metrics, Diabetes Technology Society accuracy studies.